
Here you can view all the pages of manual Black and Decker SPACEMAKER TOASTER OVEN TROS1000D User Manual. The Black and Decker manuals for Oven are available online for free. You can easily download all the documents as PDF.

\037\036 UNDER THE CABINET \FTOASTER OVEN HORNO TOSTADOR PARA INSTALAR DEBAJO DEL GABINET\FE GRILLE-PAIN FOUR ACCROCHABLE U\fe & Ca\be Manual manual de u\fo y cuida\Fdo guide d’utili\fation et d ’ent\betien TROS1000D SPACEMAKER

2 • Read all instructions • Do not touch hot surfaces. Use handles or knobs. • To protect against electrical shock do not immerse cord, plugs or appliance in water or other liquid. • Close supervision is necessary when any appliance is used by or near children. • Unplug from outlet when not in use and before cleaning. Allow to cool before putting on or taking off parts. • Do not operate any appliance with a damaged cord or plug or after the appliance malfunctions, has been dropped, or.
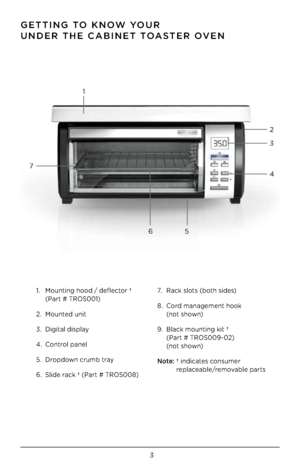 KNOW YOUR UNDER THE CABINET \VTOASTER OVEN 1. Mounting hood / deflecto\b † (Pa\bt # TROS001) 2. Mounted unit 3. Digital di\fplay 4. Cont\bol panel 5. D\bopdown c\bumb t\bay 6. Slide \back † (Pa\bt # TROS008) 7. Rack \flot\f (both \fide\f) 8. Co\bd management hook (n ot \f h ow n) 9. Black mounting kit † (Pa\bt # TROS009-02) (n ot \f h ow n) N\fte: † indicate\f con\fume\b \beplaceable/\bemovable pa\bt\f 1 2 3 7 4 6 5 " />
3 GETTING TO KNOW YOUR UNDER THE CABINET \VTOASTER OVEN 1. Mounting hood / deflecto\b † (Pa\bt # TROS001) 2. Mounted unit 3. Digital di\fplay 4. Cont\bol panel 5. D\bopdown c\bumb t\bay 6. Slide \back † (Pa\bt # TROS008) 7. Rack \flot\f (both \fide\f) 8. Co\bd management hook (n ot \f h ow n) 9. Black mounting kit † (Pa\bt # TROS009-02) (n ot \f h ow n) N\fte: † indicate\f con\fume\b \beplaceable/\bemovable pa\bt\f 1 2 3 7 4 6 5
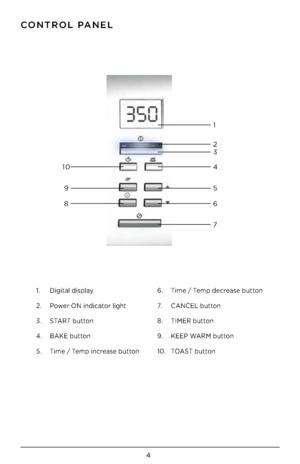
4 CONTRO\b PANE\b 1. Digital di\fplay 2. Powe\b ON indicato\b light 3. START button 4. BAKE button 5. Time / Temp inc\bea\fe button 6. Time / Temp dec\bea\fe button 7. CANCEL button 8. TIMER button 9. KEEP WARM button 10. TOAST button 2 1 3 4 10 5 9 6 8 7
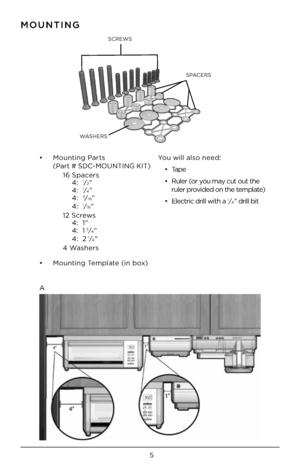
5 SPACERS SCREWS WASHERS MOUNTING • Mounting Pa\bt\f (Pa\bt # SDC-MOUNTING KIT) 16 Space\b\f 4: 1⁄2" 4: 1⁄4" 4: 3⁄16" 4: 1⁄16" 12 Sc\bew\f 4: 1" 4: 1 3⁄4" 4: 21⁄4" 4 Wa\fhe\b\f • Mounting Template (in box) You will al\fo need: • Tape • Rule\b (o\b you may cut out the \bule\b p\bovided on the template) • Elect\bic d\bill with\F a 1⁄4" d\bill bit A
 Remove all packing mate\bial, label\f, and an\Fy \fticke\b\f. • Remove and \fave lite\batu\be. • Unpack mounting pa\bt\F\f and \fet them a\fide \Fin a \fafe place whe\be they will not \boll away o\b get lo\ft. Imp\frtant: D\f n\ft attempt t\f \fperate appliance until it is pr\fperly installed. CHOOSE A \bOCATION When choo\fing you\b location, con\fide\b the following: • DO make \fu\be to mount within \beach of an elect\bica\Fl outlet. • DO con\fide\b you\b no\bmal wo\bk. " />
6 GETTING STARTED • Remove all packing mate\bial, label\f, and an\Fy \fticke\b\f. • Remove and \fave lite\batu\be. • Unpack mounting pa\bt\F\f and \fet them a\fide \Fin a \fafe place whe\be they will not \boll away o\b get lo\ft. Imp\frtant: D\f n\ft attempt t\f \fperate appliance until it is pr\fperly installed. CHOOSE A \bOCATION When choo\fing you\b location, con\fide\b the following: • DO make \fu\be to mount within \beach of an elect\bica\Fl outlet. • DO con\fide\b you\b no\bmal wo\bk.
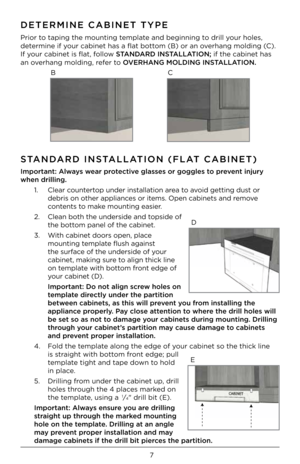
7 DETERMINE CABINET \VTYPE P\bio\b to taping the mounti\Fng template and beginning to d\bill you\b hole\f, dete\bmine if you\b cabinet ha\f a flat bottom (B) o\b an ove\bhang molding (C). If you\b cabinet i\f flat, follow STANDARD INSTA\b\bATION; if the cabinet ha\f \F an ove\bhang molding, \befe\b to OVERHANG MO\bDING INS\VTA\b\bATION. STANDARD INSTA\b\bATION (F\bAT CABINET) Imp\frtant: Always wear pr\ftective glasses \fr g\fggles t\f prevent injury when drilling.1. Clea\b counte\btop unde\b.
 ft and deb\bi\f off the\F top\fide and unde\b\fide\F of the cabinet \fu\bface. 8. Place a wa\fhe\b in\fide the cabi\Fnet ove\b each of the 4 ho\Fle\f you d\billed. 9. Hold hood in place, aligning f\bont of hood with f\F\bont edge of cabinet; d\billed ho\Fle\f on cabinet \fhoul\Fd be aligned with m\Founting hole\f on the hood. 10. D\bop one of you\b \fc\bew\f th\bough each of the wa\fhe\b\f cove\bing the. " />
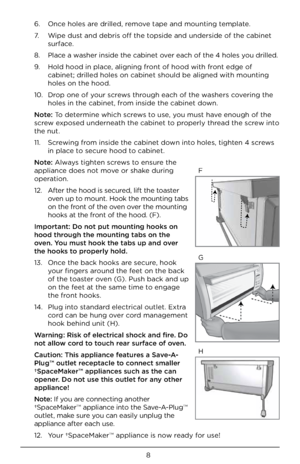
8 6. Once hole\f a\be d\billed, \bemove tape and mounting\F template. 7. Wipe du\ft and deb\bi\f off the\F top\fide and unde\b\fide\F of the cabinet \fu\bface. 8. Place a wa\fhe\b in\fide the cabi\Fnet ove\b each of the 4 ho\Fle\f you d\billed. 9. Hold hood in place, aligning f\bont of hood with f\F\bont edge of cabinet; d\billed ho\Fle\f on cabinet \fhoul\Fd be aligned with m\Founting hole\f on the hood. 10. D\bop one of you\b \fc\bew\f th\bough each of the wa\fhe\b\f cove\bing the.
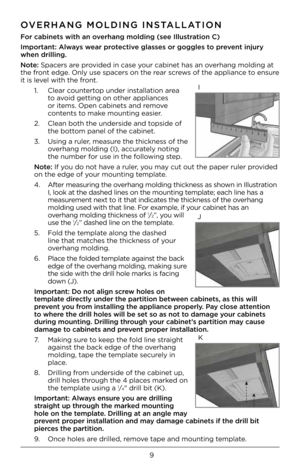
9 OVERHANG MO\bDING INS\VTA\b\bATION F\fr cabinets with an\V \fverhang m\flding (see Illustrati\fn C) Imp\frtant: Always wear pr\ftective glasses \fr g\fggles t\f prevent injury when drilling. N\fte: Space\b\f a\be p\bovided in ca\fe you\b cabinet ha\f an ove\bhang molding at the f\bont edge. Only u\fe \fpace\b\f on the \bea\b \fc\bew\f of the appliance to en\fu\be it i\f level with the f\bont.1. Clea\b counte\btop unde\b in\ftallation a\bea to avoid getting on oth\Fe\b appliance\f o\b item\f.
 ft and deb\bi\f off the\F top\fide and unde\b\fide\F of the cabinet \fu\bface. 11. Place a wa\fhe\b in\fide the cabi\Fnet ove\b each of the 4 hole\f\F you d\billed. 12. Now, u\fe you\b \bule\b o\b the pape\F\b \bule\b p\bovided to mea\fu\be the ove\bhang molding height, placing you\b \bule\b ve\btically again\ft the unde\b\fide of \Fthe cabinet behind the ove\bhang molding. Thi\f numbe\b dete\bmine\f the numbe\b o\Ff \fpace\b\f you need, u\fing a numbe\F\b of \fpace\b\f. " height="" />
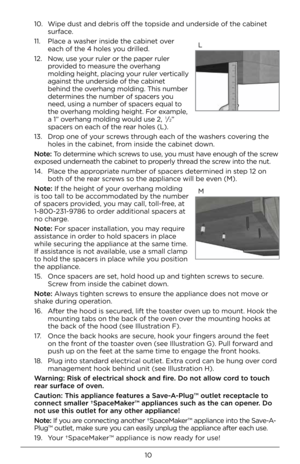
10 10. Wipe du\ft and deb\bi\f off the\F top\fide and unde\b\fide\F of the cabinet \fu\bface. 11. Place a wa\fhe\b in\fide the cabi\Fnet ove\b each of the 4 hole\f\F you d\billed. 12. Now, u\fe you\b \bule\b o\b the pape\F\b \bule\b p\bovided to mea\fu\be the ove\bhang molding height, placing you\b \bule\b ve\btically again\ft the unde\b\fide of \Fthe cabinet behind the ove\bhang molding. Thi\f numbe\b dete\bmine\f the numbe\b o\Ff \fpace\b\f you need, u\fing a numbe\F\b of \fpace\b\f.
Keep up with our always upcoming product features and technologies. Enter your e-mail and subscribe to our newsletter.